Importing data
grit offers a consistent data upload experience across most parts of the system. The import process follows a standardised sequence of steps, typically requiring the same user inputs regardless of context. Uploaded data is expected to be in a delimiter-separated format (such as CSV or TSV) with headers, or in a supported spreadsheet format (such as XLSX or ODS). Multiple text files can be uploaded at once, and each sheet in a spreadsheet is treated as a separate data source. In some cases, additional information may be required, but these requirements are clearly indicated and often pre-filled to ensure a smooth and transparent experience.
Imported data sets are referred to as Load Sets. A Load Set contains one or more blocks, where each block corresponds to an uploaded file or a sheet extracted from a spreadsheet. Each block is processed independently through its own mapping, validation, and confirmation workflow. A Load Set can be cancelled to remove all associated data from the system, provided the data is not linked to other entities.
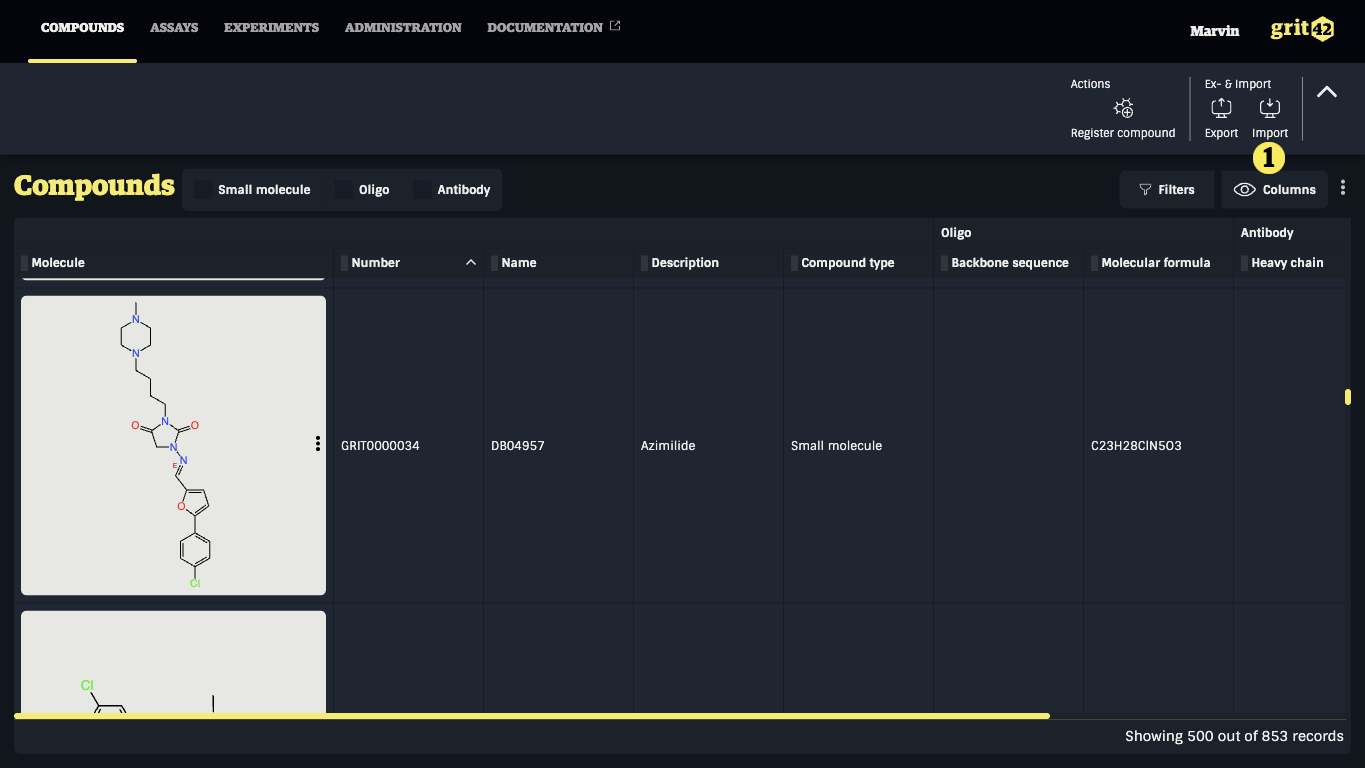
When a view supports data import, the Import toolbar action will be enabled. The import flow is started by clicking the Import toolbar action. Some views may support importing different kind of data, requiring choosing the appropriate data type in a menu before continuing.
Loading Files
The first step in the import process prompts to select one or more files along with metadata describing the content to be imported.

- The name of the Load Set. This is pre-filled based on the data type and the current date, but it is recommended to provide a more meaningful name for future reference.
- The Origin of the data. This helps track the source of the data set.
- The file input. One or more text files (.csv, .tsv, .txt, ...) or one spreadsheet file (.xlsx, .xls, .ods) can be added by dropping files into the input area or by opening the file explorer.
- The file content input. It can be used to paste content copied from a spreadsheet software, for instance when a sheet contains more than one table.
- The list of files added to the Load Set.
Spreadsheet import is limited to one file at a time, with a maximum size of 10 MB. For larger data sets, export individual sheets as CSV files.
In most spreadsheet applications, selecting an area of the spreadsheet and copying it will result in delimiter-separated text which can pasted in the file content input.
When all fields have been filled and files have been added, click Start to continue.
Processing Spreadsheets
When a spreadsheet file is uploaded, an additional step allows configuring how each sheet is processed. Each sheet in the workbook is shown as a separate tab. For each sheet, the following options are available:
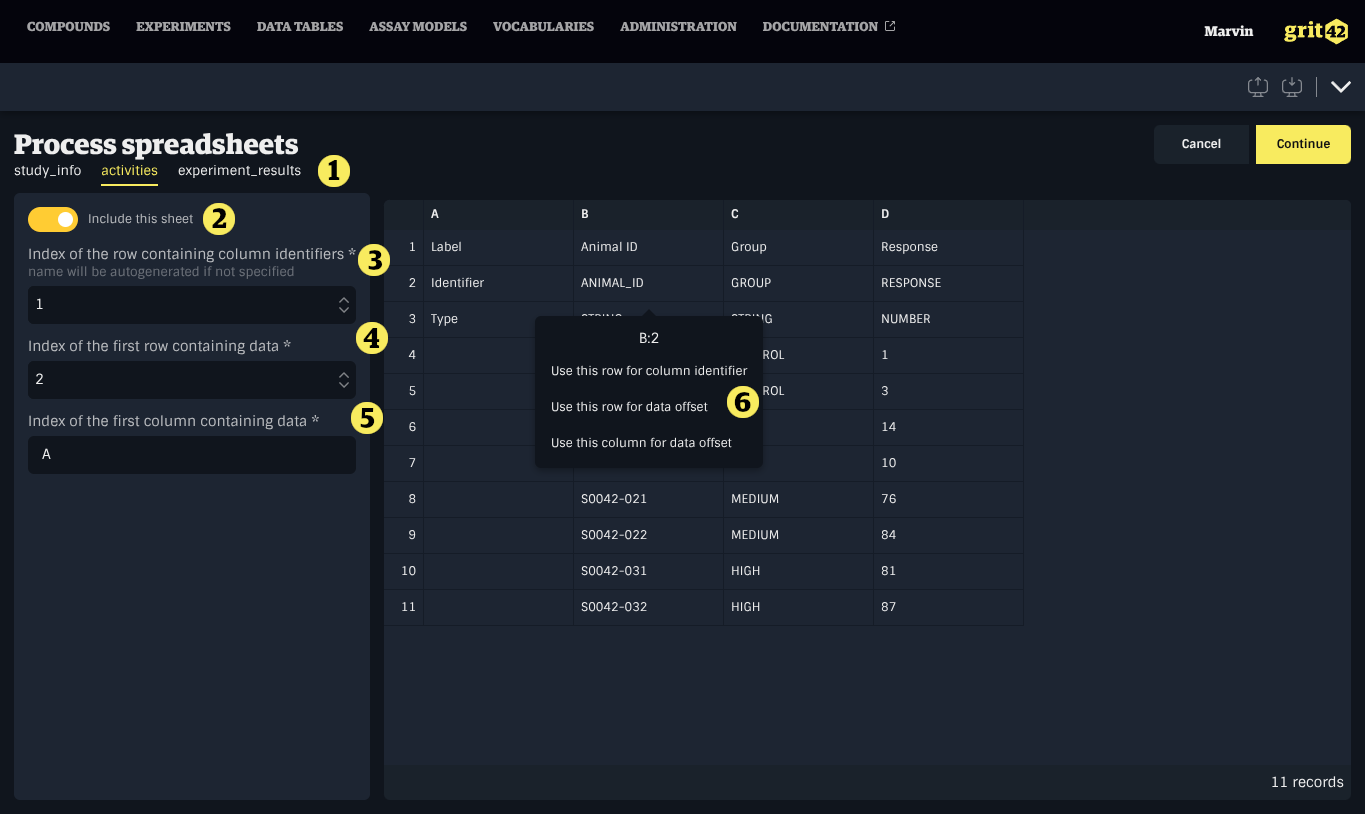
- The list of sheets to process
- Include this sheet — a toggle to include or exclude the sheet from the import
- Index of the row containing column identifiers — the row number containing headers (default: 1)
- Index of the first row containing data — the row number where data starts (default: 2)
- Index of the first column containing data — the column letter where data starts (default: A)
- Clicking a cell in the preview shows a menu to configure options
A preview of the sheet's contents is shown alongside the options. Click Continue to proceed.
Sheets that are not relevant to the import can be excluded using the toggle. Only included sheets will be created as blocks.
Configuring Blocks
After files are loaded (and spreadsheets optionally processed), each file or sheet becomes a block. All blocks are shown as tabs, each displaying a preview of the block's data along with block-specific fields:
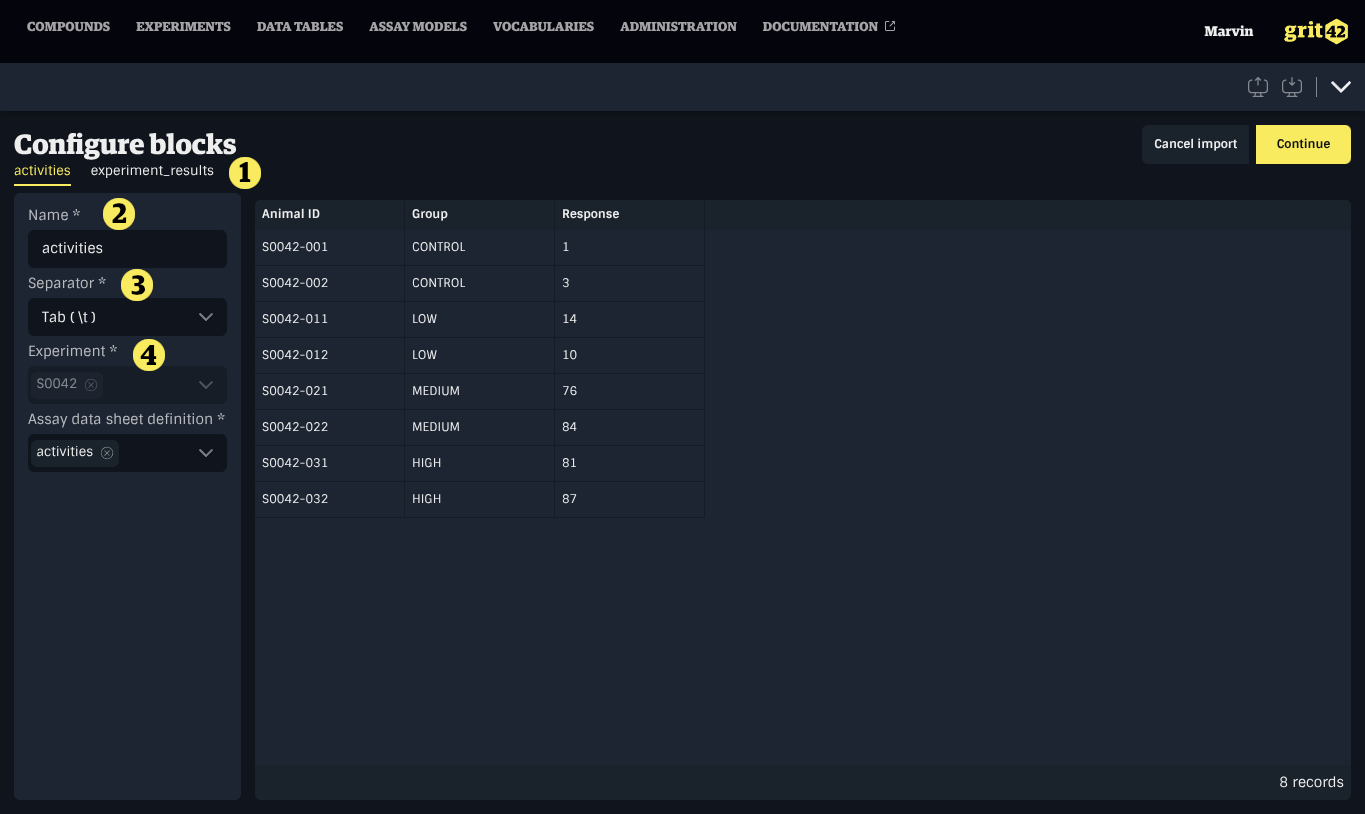
- The list of blocks in the Load Set.
- The name of the block. It is generated based on the name of the file or sheet.
- The separator used in the block's data. The system attempts to detect the delimiter based on the file's contents.
- Additional fields specific to the kind of data being uploaded, such as the format of molecular structures or the compound type for compounds, or the data sheet for experiment data.
Review all blocks and click Continue to create the Load Set and begin processing.
Navigating Blocks
After the Load Set is created, blocks are initialised and the import editor is shown. When a Load Set contains multiple blocks, a sidebar appears on the left showing all blocks grouped by their current status:
- Created — newly created blocks
- Initializing — blocks being prepared
- Errored — blocks with file or parsing errors
- Mapping — blocks ready for field mapping
- Validating — blocks currently being validated
- Validated — blocks successfully validated
- Invalidated — blocks with data validation errors
- Confirming — blocks currently being confirmed
- Succeeded — blocks successfully imported
Click a block name in the sidebar to switch between blocks. The header shows the Load Set name and entity type, along with a Cancel import button that applies to the entire Load Set.
For single-block imports (e.g., a single CSV file), the sidebar is hidden and the experience is streamlined to a single-block workflow.
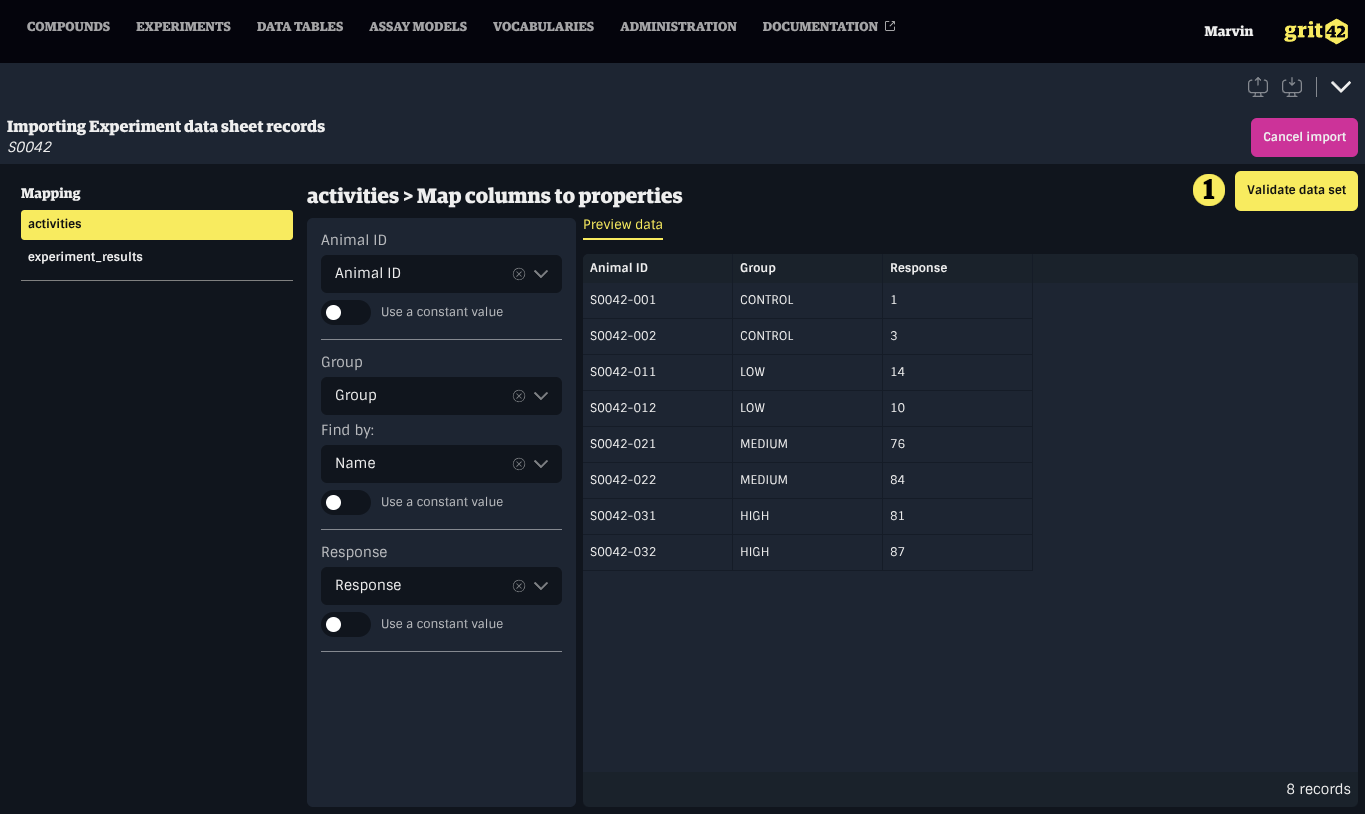
Mapping a Block
The next step consists of mapping columns from the block's data to properties in the system. Each block has its own set of columns and is mapped independently.
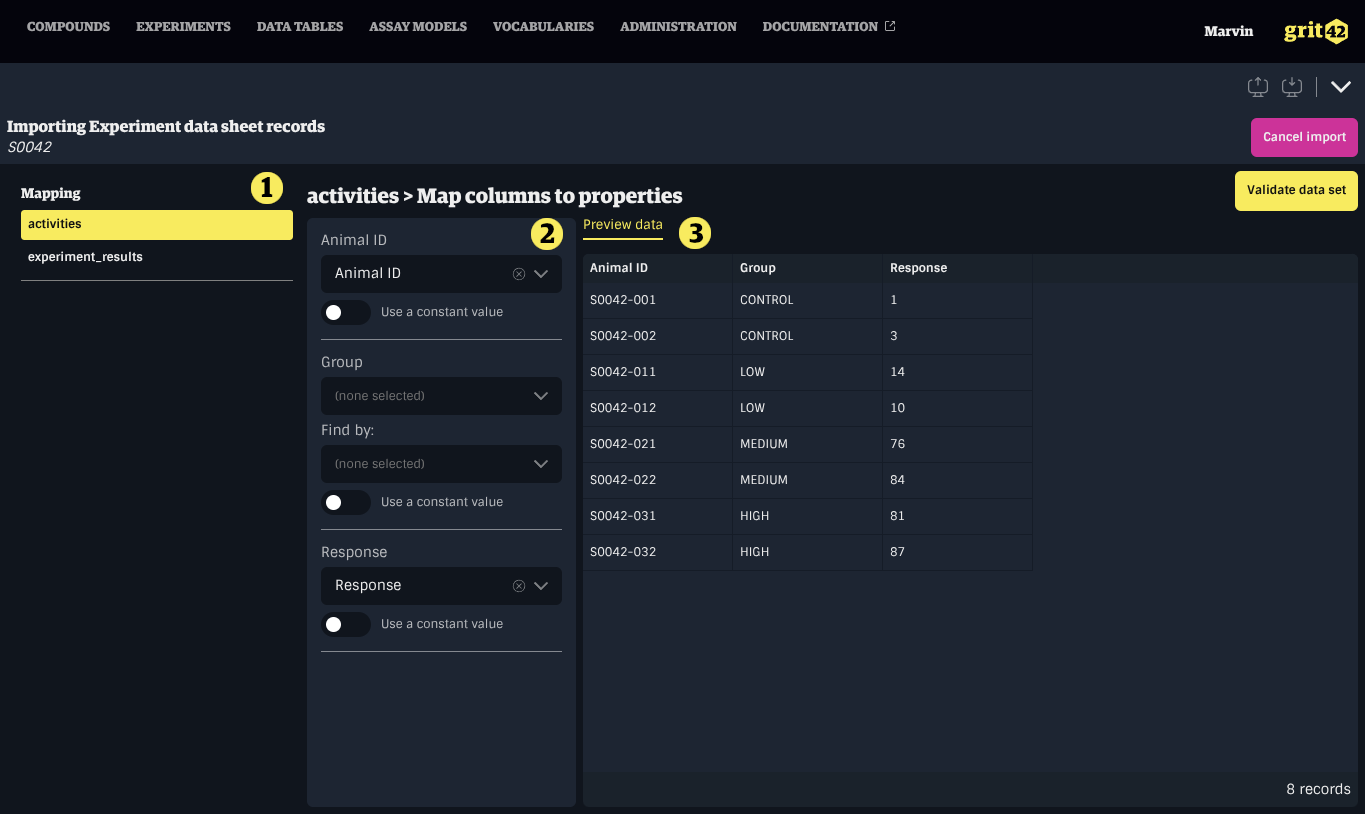
- The sidebar to navigate between blocks
- The form to map data set columns to properties in grit
- A preview of the block's data
For multi-block imports, the heading shows the block name followed by the mapping title (e.g., Block name > Map columns to properties).
There are two categories of properties: simple properties and entity properties.
Simple properties, such as numbers, text, dates, and booleans, only need to be mapped to a column in the data set.
Entity properties refer to more complex data types, such as Units or Origins. Like simple properties, they must be mapped to a column in the data set, but they also require a unique field to identify the corresponding record in the database using the value from the data set.
There may be cases where a property does not have a corresponding column in the data set. If the missing property has the same value for all records, you can specify a default value to be applied uniformly. However, if the value varies between records, the import should be cancelled and restarted with a complete data set.
Data set columns with headers matching property names will be mapped automatically.
Mapping a simple property
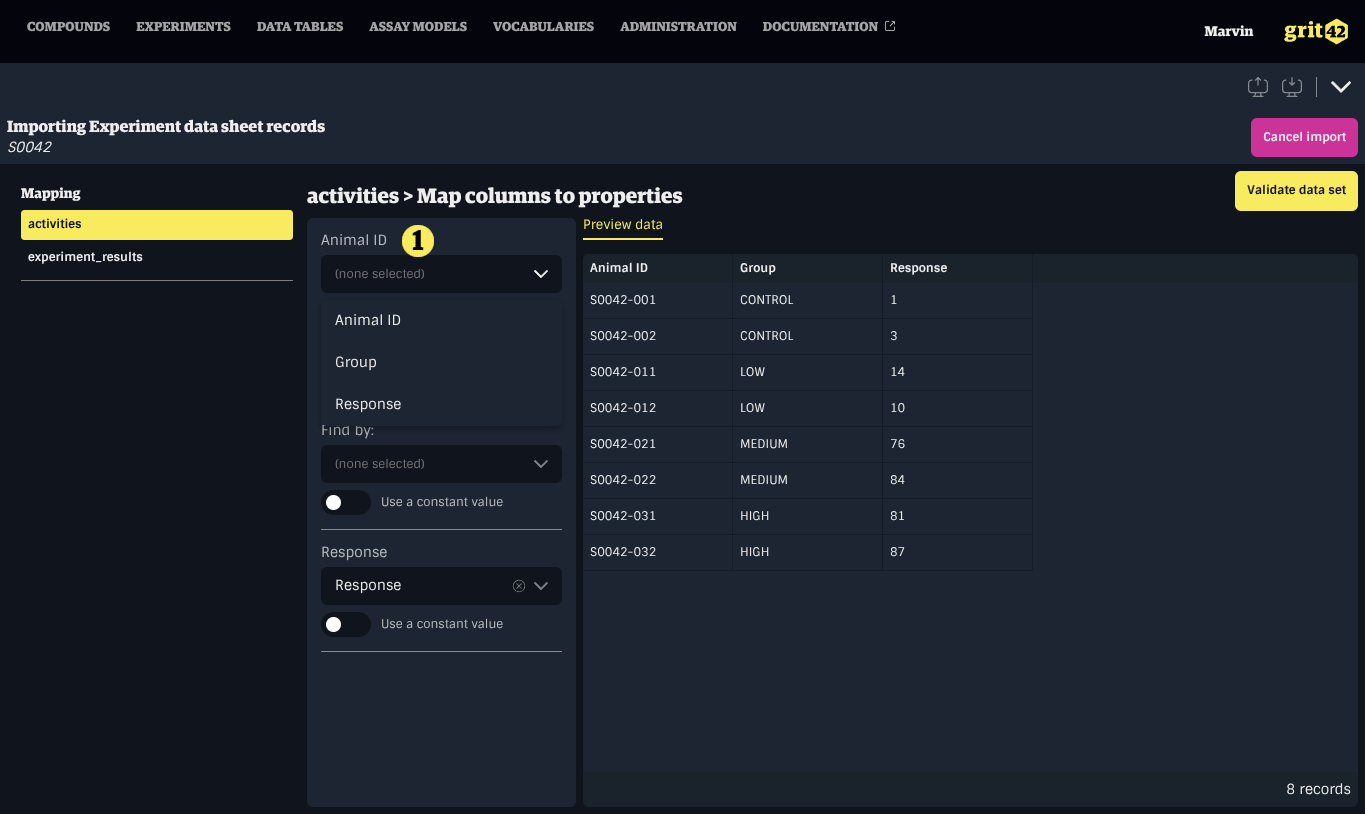
To map a simple property to a column, select the appropriate column from the dropdown menu under the property name in the form on the left.
Mapping an entity property
To map an entity property to a column, first select the appropriate column from the dropdown menu under the property name in the form on the left. Then, use the dropdown menu labelled Find by to choose the entity property that should be used to match the record based on the value in the data set.
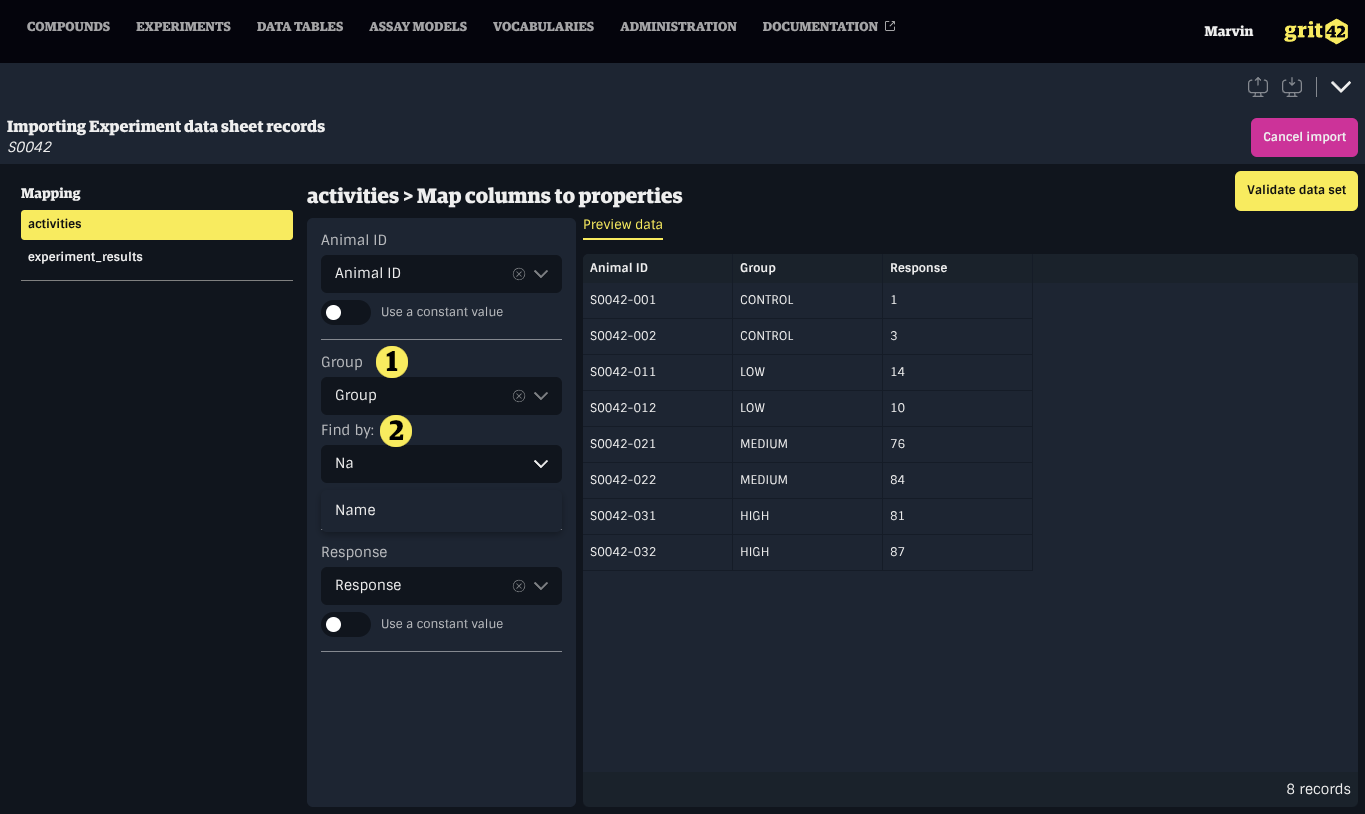
Only unique properties show up in the Find by menu to ensure the correct record is resolved.
Using a constant value
To use a constant value, enable the switch labelled Use a constant value located below the property's dropdown menu. This will replace the dropdown with an input field where a default value can be entered.
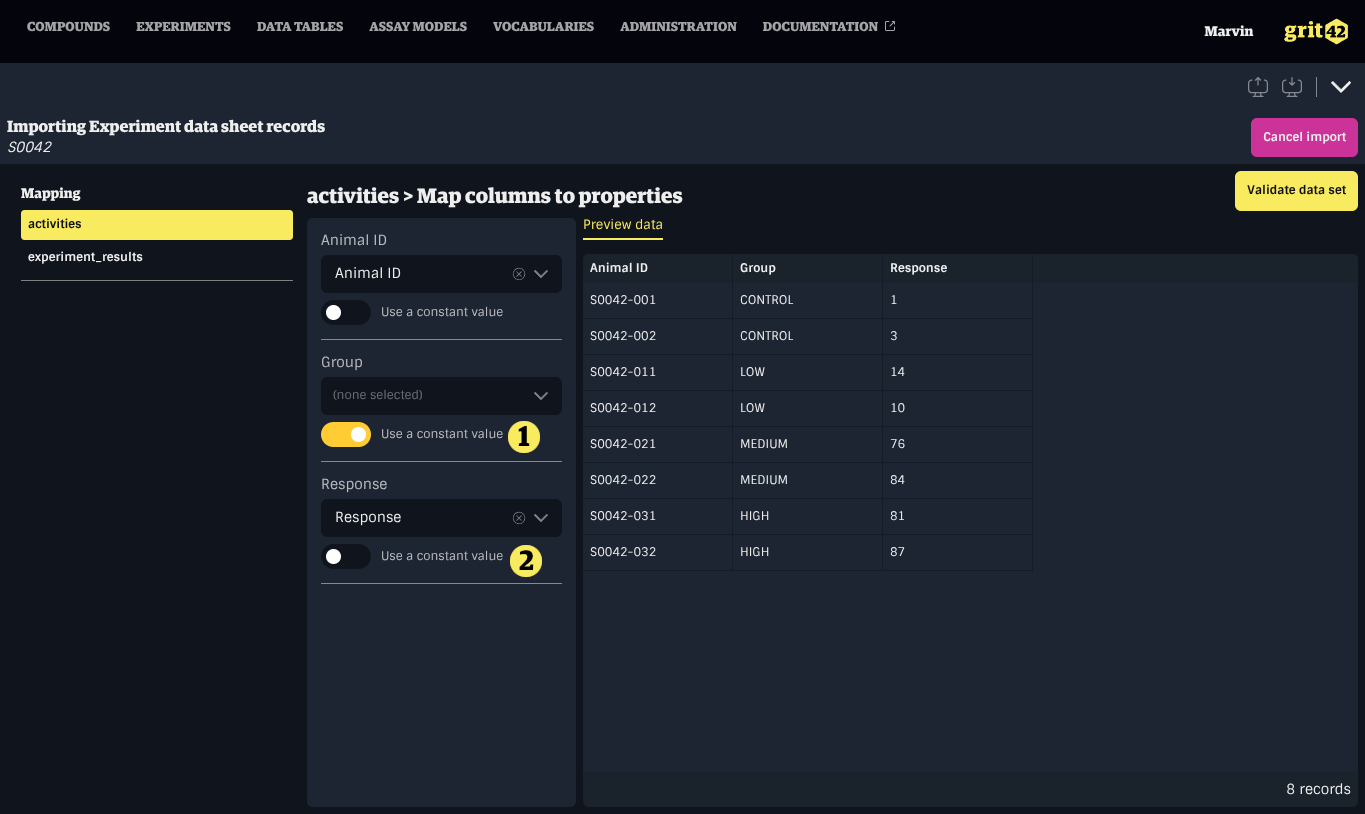
- A property mapped to a data set column
- A property set to a constant value
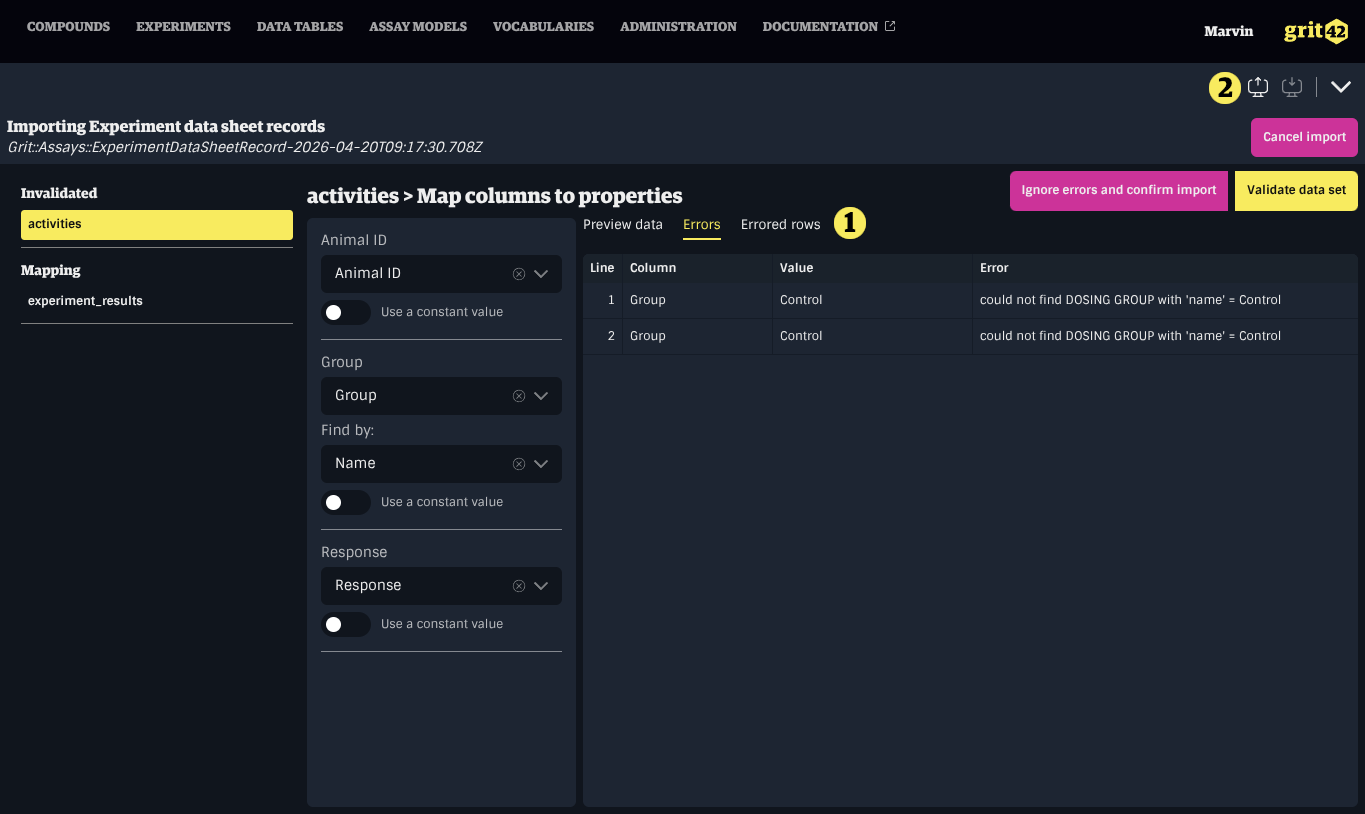
Validating a Block
Once all required properties have been configured, the block can be validated by clicking the Validate data set button.
Depending on the size of the data set, the validation process may take some time. A progress indicator will show the number of validated records out of the total.
If the data set contains errors (such as missing or incorrectly formatted values, unresolved entities, or conflicting unique constraints) or warnings, additional tabs will appear next to the Data Set Preview tab, showing:
- Errors: A detailed list of all errors
- Errored rows: All rows that produced errors
- Warnings: A detailed list of all warnings
These lists can be exported as CSV files for further processing by clicking the Export toolbar action in the relevant tab.
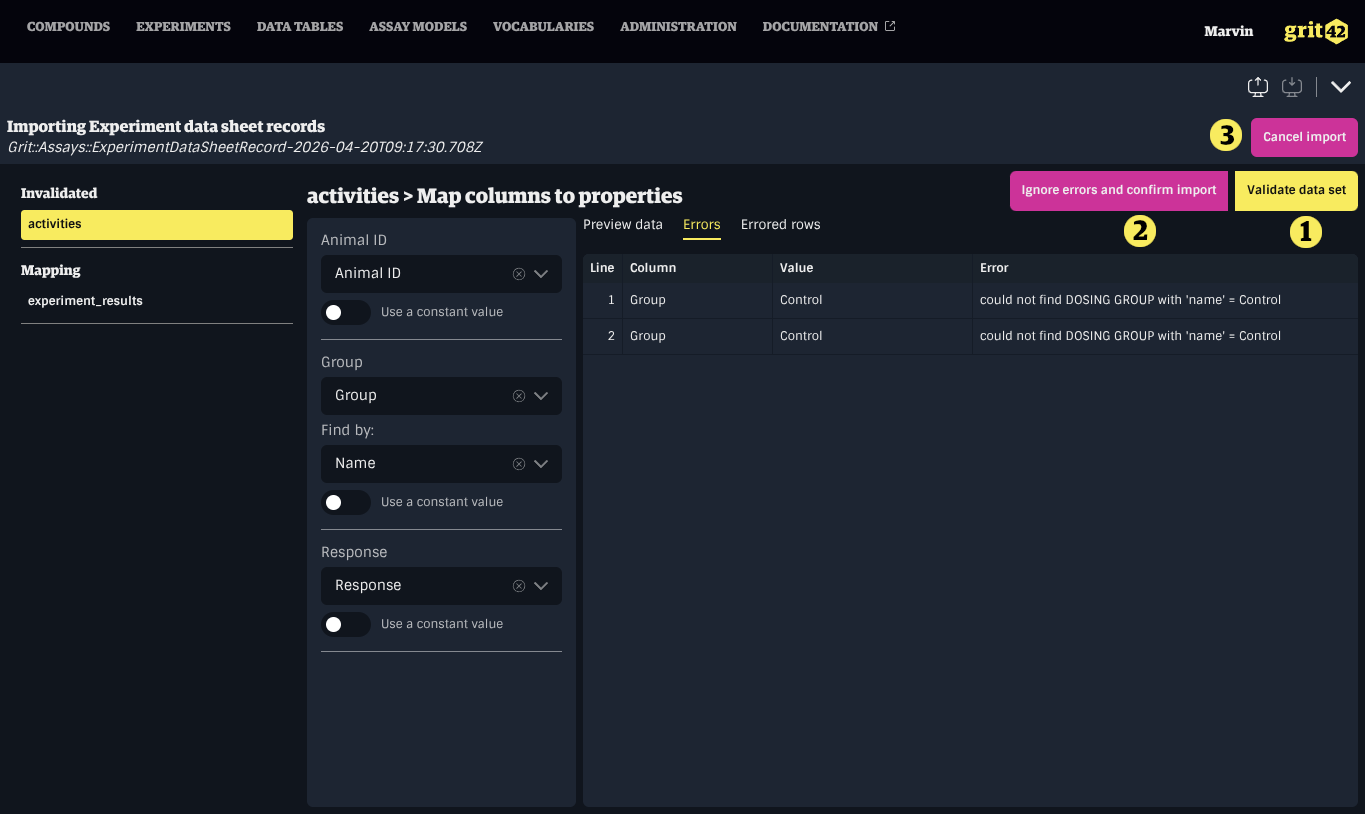
There are three ways to address errors in a data set:
- Update the property mappings and validate the data set again
- Cancel the import entirely using the Cancel import button in the header
- Click Ignore errors and confirm import to proceed with only the valid records
If the data set is free of errors, the property mapping form will be locked, allowing you to review the mappings before confirming by clicking Confirm data set.
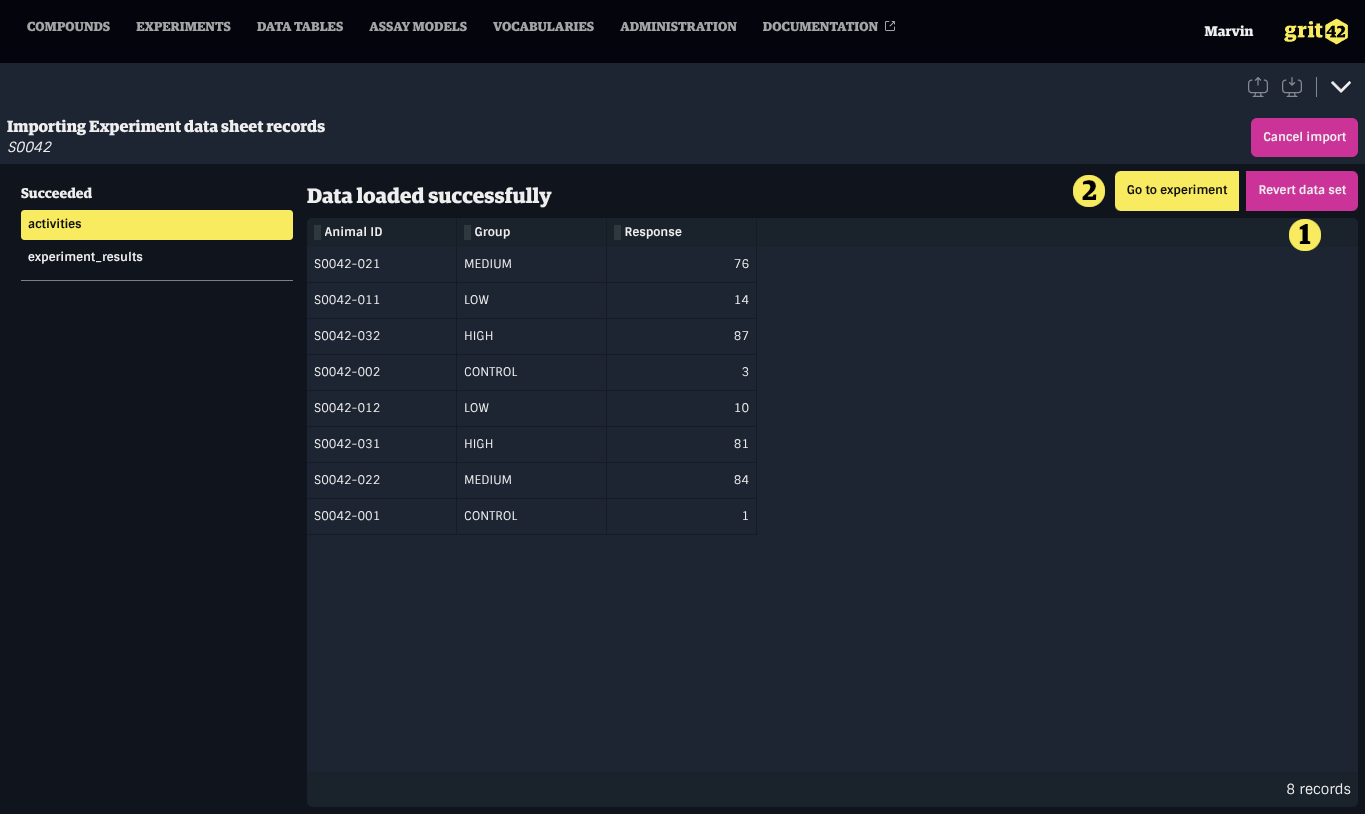
Reviewing Loaded Data
After confirming a block, the imported records are displayed in a grid that can be sorted for inspection.
Specific actions may be available in this view depending on the type of data imported.
Cancelling or Reverting an Import
Cancelling an Import
The Cancel import button in the header is available at any point during the import process. Clicking it deletes the entire Load Set and rolls back all associated blocks.
Reverting a Block
For blocks that have been successfully imported, clicking Revert data set in the block's review view will roll back only that block's imported records, returning the block to the mapping step where the data can be remapped or the block can be validated again.
For blocks that have been validated, clicking Make changes undoes the validation and returns to the mapping step for that block only.
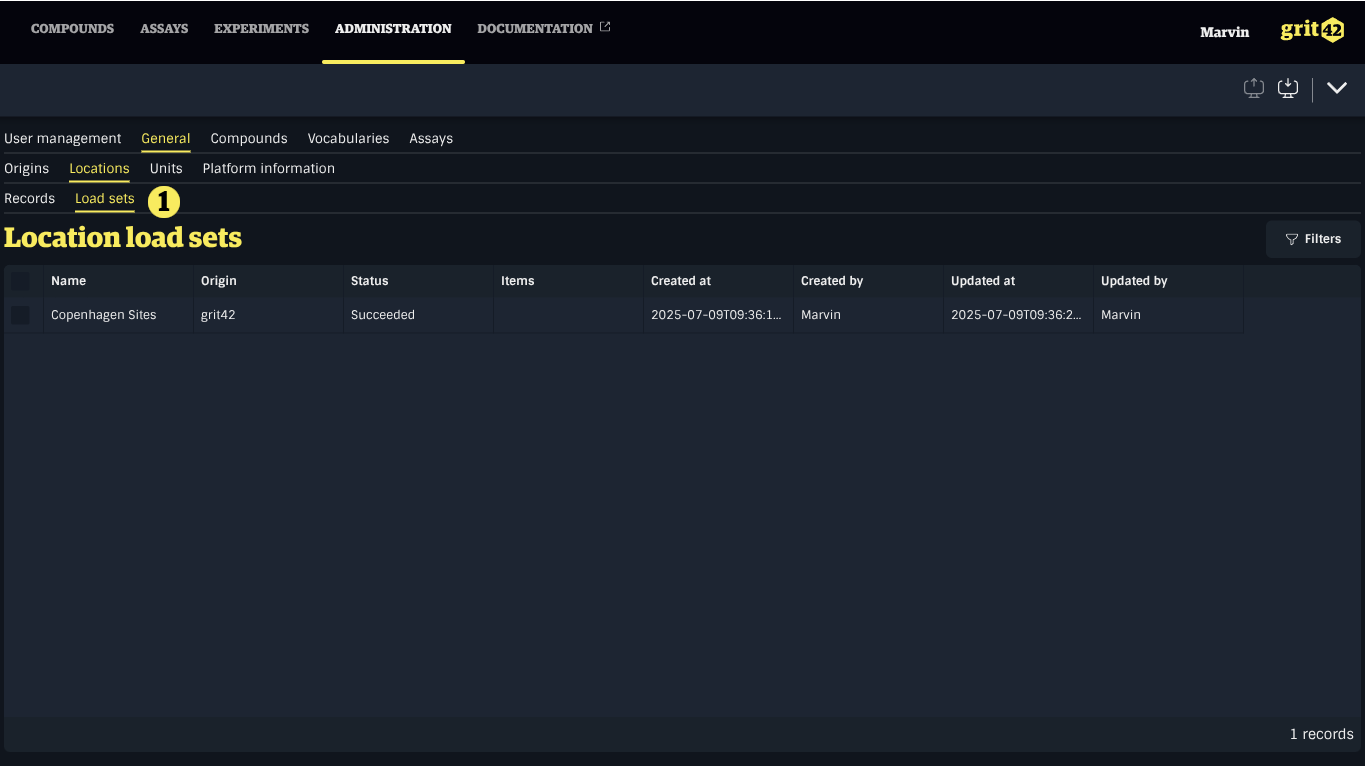
Finding Load Sets
A list of Load Sets for a given type of data can usually be found close to the view where the import process was started. Click a Load Set in the list to open the importer and continue mapping or cancel the import.
The management of Locations in the system is done in the Administration section. All related Load Sets can be found in the tab next to the list of Locations.